


Table of contents
- What is Snowflake?
- What are the Features of Snowflake?
- Why we need to consider Snowflake Datawarehouse?
- Types Of Snowflake Editions
- Data Loading in Snowflake
- Bulk Data Loading
- Continuous Data Loading Using Snowpipe
- What are Snowflake Stages?
- Streams in Snowflake
- Tasks in Snowflake
- Data unloading from SnowFlake
- Strored Procedures in Snowflake
- User-Defined Functions
- Data Cloning in Snowflake
- Time Travel in Snowflake
- Data Sharing in Snowflake
- Reader Accounts in Snowflake
- Micro partitions in Snowflake
What is Snowflake?
Snowflake is a cloud-native platform that eliminates the need for separate data warehouses, data lakes, and data marts, allowing secure data sharing across the organization. Its platform sits on public clouds and allows organizations to easily unify and connect to a single copy of all their data.
What are the Features of Snowflake?
Snowflake is true self-managed service.
Self-Managed Service:
No hardware (virtual or physical) needs to be selected, installed, configured, or managed.
No virtual software needs to be installed, configured, or managed.
Ongoing maintenance, management, upgrades, and tuning are managed by Snowflake.
Users do not need to install Snowflake as packaged software.
Micro partitions:In Snowflake, data is stored in micro-partitions, which are immutable, compressed, and internally organized sets of data files. These files typically contain a range of values for one or more columns of a table. Micro-partitions are the basic unit of storage and query processing in Snowflake.
Ad hoc heavy data processing: Snowflake was engineered to seamlessly accommodate ad-hoc queries of all types. Its cutting-edge architecture excels in handling ad-hoc tasks, as it enables the provisioning of additional compute resources on-demand, ensuring that these queries can be addressed promptly without disrupting concurrent database operations.
Data cloning :When you clone a table it won’t take separate storage and it will point to same storage. When we modify meta data can changes. After cloning if we have deleted one table then the other table will be avaialable, meta data can be deleted.
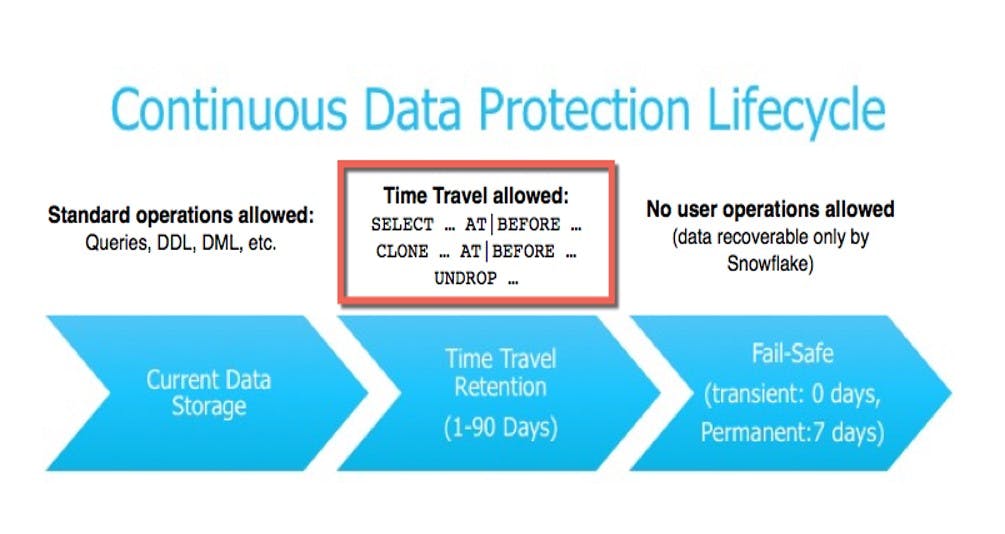
Time Travel: We can achive the time travel retention is 1 to 90 days.we can undrop the table and when a permanent table is deleted, it enters Fail-safe for a 7-day period.
Data sharing: If we request Snowflake people from the data marketplace without any script, they will create it as a share. Otherwise, we need to visit the site and later ingest it into our database through a JSON file. For data sharing, both parties should be in the same region.
Reader Accounts: All reader accounts are under the provider account, with all billing being handled through the provider account. Even though a reader account might not have a Snowflake account, the provider has granted access to it.
Why we need to consider Snowflake Datawarehouse?
The pay-as-you-go pricing model is appealing, especially for teams that previously found powerful querying systems too costly or complex to implement without extensive DevOps support.
Snowflake supports various sophisticated BI tools such as Tableau, Looker, Mode Analytics, Qlikview, and Power BI. Check if your preferred tool is among them.
Its value shines brightest when data pipelines drive advanced analytics initiatives. Data is the fuel for these efforts; without it, there's nothing to load or analyze.
Despite Snowflake's user-friendly interface, many teams face challenges with their data infrastructure. It's crucial to equip teams with the necessary skills and training to handle their data stacks effectively. Building a dedicated data team passionate about their work is essential for success in data management and analytics efforts.
Types Of Snowflake Editions
In Snowflake, there are three main editions, each offering different features and capabilities:
Standard Edition: This edition provides basic functionalities for data warehousing and analytics. It includes features such as data storage, compute resources, and query processing. Standard Edition allows for one day of time travel, which means users can access historical data up to one day in the past.
Enterprise Edition: This edition includes all the features of the Standard Edition and adds additional capabilities for advanced analytics and data management. Enterprise Edition extends time travel to 90 days, allowing users to access historical data up to three months in the past. It also introduces features like multi-cluster warehouses, which enable parallel processing of queries across multiple compute clusters, and materialized views, which improve query performance by storing pre-computed results.
Business Critical Edition: This edition builds upon the Enterprise Edition by adding enhanced security and data protection features. In addition to the capabilities of the Enterprise Edition, Business Critical Edition includes features like advanced security controls, data encryption, and write-protected data. These features are designed to ensure the integrity, confidentiality, and availability of data in highly regulated or sensitive environments.
Data Loading in Snowflake
There are three ways of data loading
Bulk loading
Continuous loading using Snowpipe
Loading via the web interface.
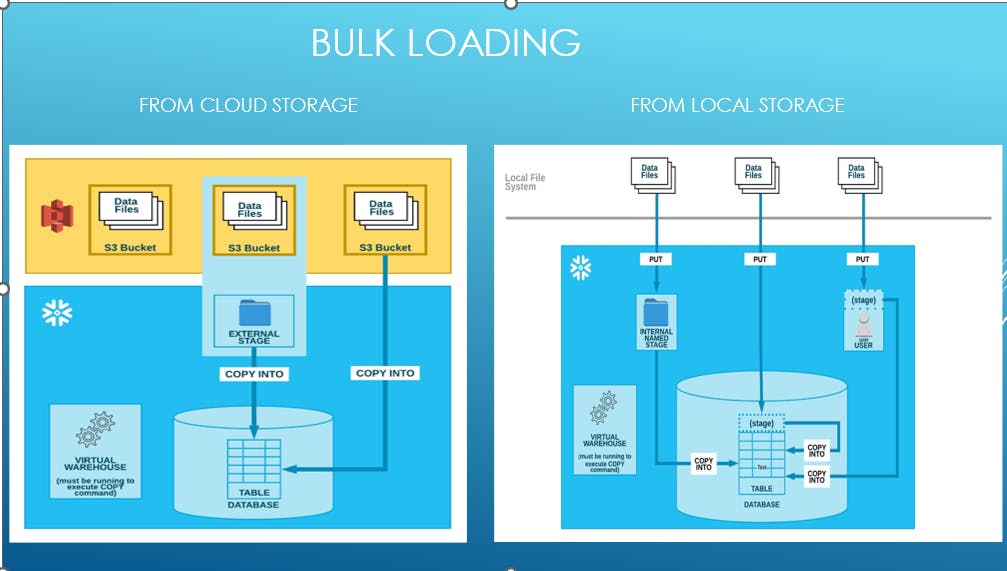
Bulk Data Loading
Bulk load: Data can be loaded into Snowflake in a number of ways.
Syntax:
COPY INTO [<namespace>.]<table_name>
FROM { internalStage | externalStage | externalLocation }
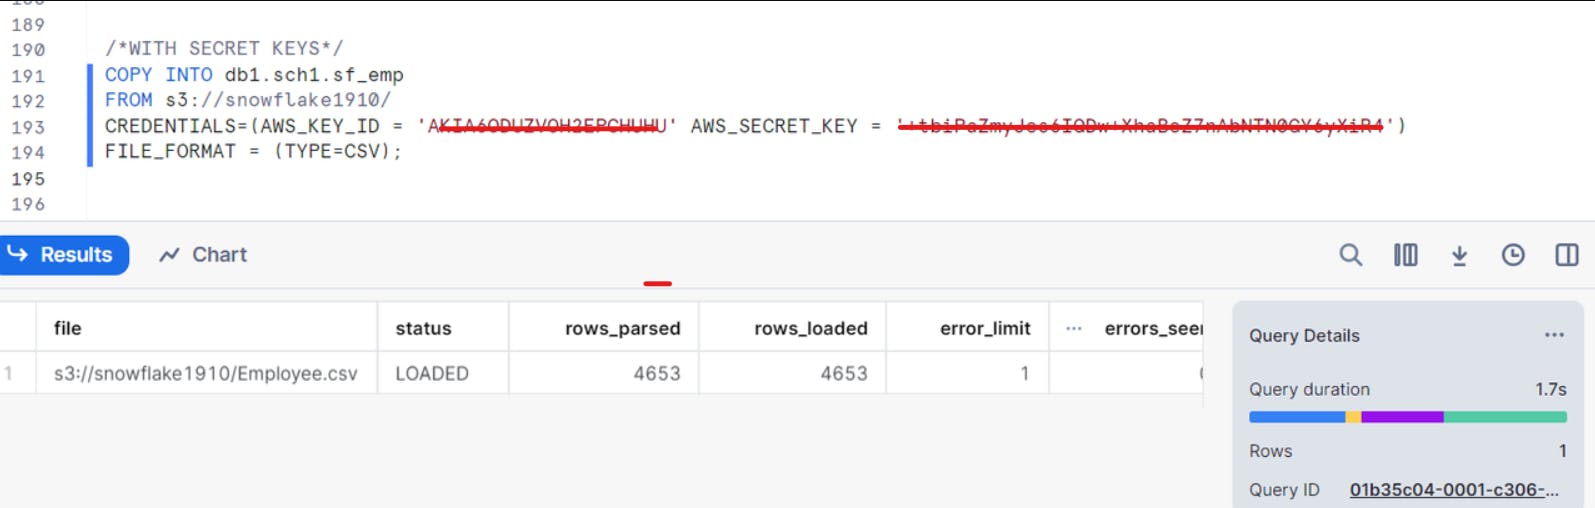
Bulk loading from Amazon S3:
Data loading into snowflake from amazon s3 by using SECRET KEYS
Data loading into snowflake from amazon s3 by using STORAGE INTEGRATION:
WITH STORAGE INTEGRATION create storage integration AWS_S3_SOURCE_DATA type = external_stage storage_provider = s3 storage_aws_role_arn = 'arn:aws:iam::992382397327:role/sharathsnowflakerole' enabled = true storage_allowed_locations = ('s3://snowflake1910');

desc integration AWS_S3_SOURCE_DATA by this we will get STORAGE_AWS_IAM_USER_ARN, STORAGE_AWS_EXTERNAL_ID add these two valuesintrust policy of the IAM role.
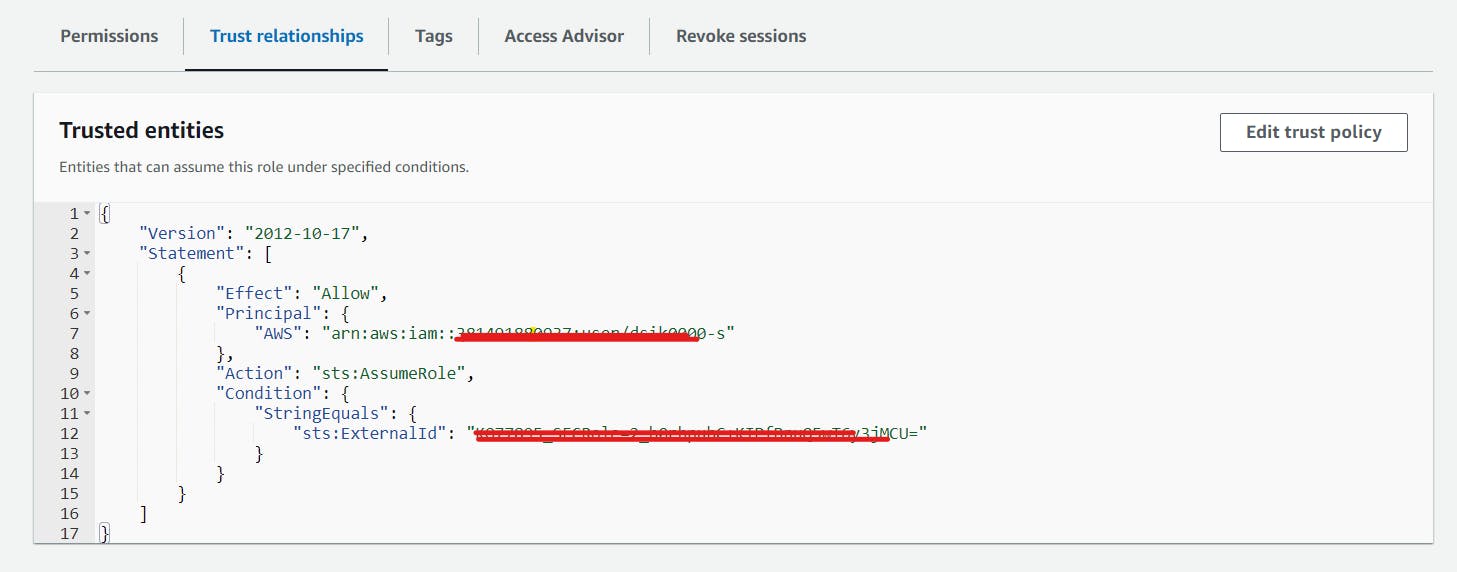
Using Storage Integration is considered a best practice as it helps to safeguard our credentials from potential malicious attacks.
Continuous Data Loading Using Snowpipe
Snowpipe swiftly loads data within minutes of files being added to a stage and submitted for ingestion, ensuring users promptly access the latest results once raw data becomes available.
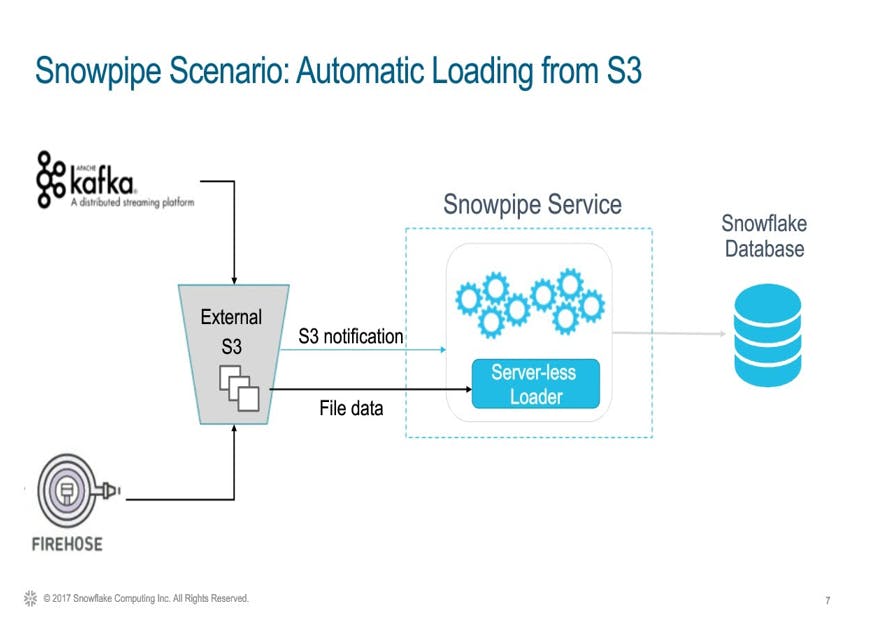
Snowpipe utilizes compute resources from Snowflake, operating under a serverless compute model. These resources, provided by Snowflake, are automatically adjusted in size and scaled up or down as needed.
Steps for creating a Snowpipe:
Set Up a Stage: Configure an external stage in Snowflake pointing to the location where your data files will be stored
create storage integration AWS_S3_SOURCE_DATA type = external_stage storage_provider = s3 storage_aws_role_arn = 'arn:aws:iam::992382397327:role/sharathsnowflakerole' enabled = true storage_allowed_locations = ('s3://snowflake1910');create or replace stage stg_S3_Source_data url='s3://snowflake1910/' storage_integration = AWS_S3_SOURCE_DATA;Create a Snow Pipe:
create or replace pipe pipe_Sf_Emp auto_ingest = true as copy into emp from @stg_S3_Source_data/;After creation of Snow pipe we need to set the event notification in Amazon S3 bucket with sqs notification_channel from show pipes command**.**
SELECT * FROM TABLE (information_schema.copy_history(table_name=>'db1.sch1.SF_EMP', START_TIME=>DATEADD(HOURS, -1, CURRENT_TIMESTAMP())));By using this we can track the data of our table.If we want to stop the pipe explicitly then by using following query we can stop the snow pipe.
alter pipe pipe_LANDING_emp SET PIPE_EXECUTION_PAUSED = TRUE;Snowflake provides a feature called "Automatic Retry" for pipes, which allows you to automatically retry loading files that failed to load within the last seven days. To enable this feature, you can set the
AUTO_INGESToption toTRUEwhen creating or altering the pipe.ALTER PIPE REFRESH pipe_Sf_Emp;
What are Snowflake Stages?
Snowflake Stages serve as storage locations for data files during loading and unloading operations.
Data can be moved between internal or external locations within the Snowflake environment using these stages.
Businesses utilize Snowflake stages to transfer data between external sources like S3 buckets and internal Snowflake tables.
During the loading process, Snowflake stages play a crucial role in managing data.
For instance, temporary tables can be created within Snowflake stages to temporarily store data before loading it into the main table, ensuring smooth data loading processes.
Snowflake stages offer a secure environment for data storage, with encryption features available to enhance data security and prevent unauthorized access.
There are two types of stages in Snowflake. i.e. **External stage and Internal stage.**We can create the stages by using Secrete keys and Storage Integration.
External Stage
External stages grant users control over data transfers and safeguard against unauthorized access, ensuring control over the data transfer process.
They provide a secure environment for data storage, allowing encryption to bolster security measures and prevent unauthorized access.
Syntax:

Data loading using external stage:
COPY INTO COPY INTO db1.sch1.sf_emp FROM @stg_S3_Source_data_new FILE_FORMAT = (TYPE=CSV) FORCE=TRUE
Internal Stage
Snowflake internal stages temporarily store data files during loading and unloading operations.
Managed by Snowflake, they serve as intermediate storage inaccessible directly to users.
Internal stages optimize data loading and unloading by enabling parallel processing of multiple data files.
They enhance performance by allowing Snowflake to load or unload data files in parallel, improving efficiency.
There are three types of internal stages in Snowflake:
Named stage
User stage
Table stage.
User Stage:
Each user is assigned a default Snowflake stage for file storage, facilitating file access for individual users, particularly for scenarios involving copying files into multiple tables.
User stages, referenced using @~, are immutable and cannot be modified or deleted; however, they are not suitable when multiple users need access to the same files.
Syntax:
putfile://C:\Users\shara\Downloads\archive\Employe.csv @~;by using this command we can upload the files into user stage.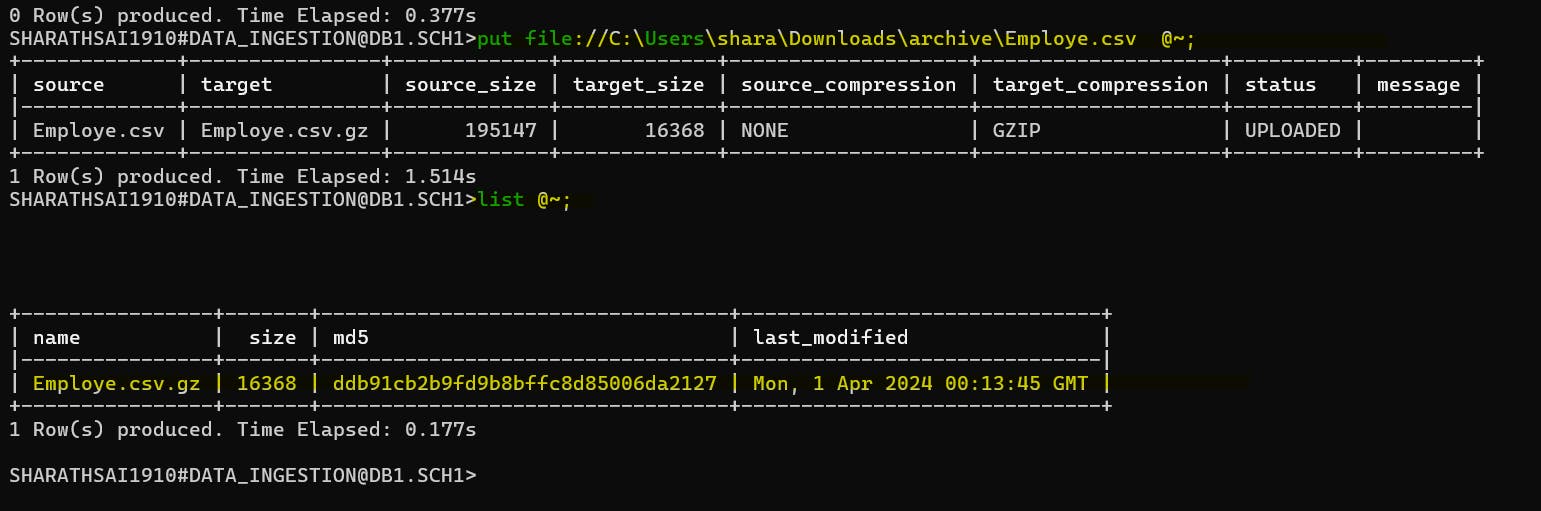

Table Stage:
Every table is assigned a default Snowflake stage for file storage, ideal for files requiring access by multiple users and copying into a singular table.
Table stages, referenced using @%, mirror the table's name; for example, a table named "Customers" would have a stage referenced as @%Customers. These stages are immutable and cannot be modified or deleted.
Syntax:
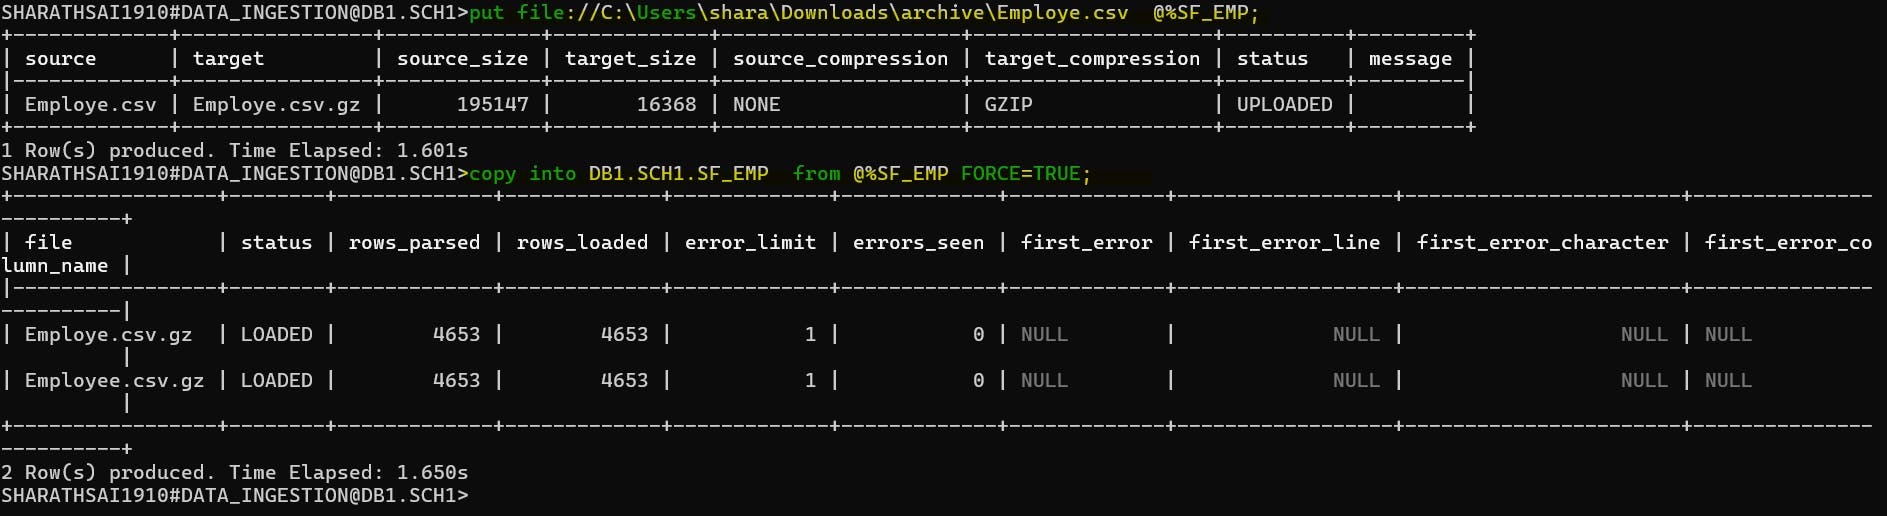
copy into DB1.SCH1.SF_EMP from @%SF_EMP FORCE=TRUE;
Named Stage:
Internal stages are flexible objects for data loading.
Naming internal stages is optional but recommended for regular data loads involving multiple users or tables.
For data files loaded solely by you or into a single table, using your user stage or the table's stage may suffice.
Syntax:
create stage DB1.SCH1.MYSTAGE3;

put file://C:\Users\shara\Downloads\archive\Employe.csv @DB1.SCH1.MYSTAGE3;
copy into DB1.SCH1.SF_EMP from @DB1.SCH1.MYSTAGE3 FORCE=TRUE;

Best practise for loading data into Snowflake :
Storage Integration ==> Creation of Stage ==>Copy into Tables.
Establish separate stages for individual external data sources to streamline access and facilitate data movement to Snowflake tables.
Employ Snowflake's table staging process to load data into temporary tables before finalizing the transfer to the primary Snowflake table, ensuring data integrity.
Utilize Snowflake's COPY INTO stage table process to exert control over data transfers and fortify data security against unauthorized access.
Streams in Snowflake
Stream objects in Snowflake record DML changes made to tables, including inserts, updates, and deletes, along with metadata about each change.
When the first stream for a table is created, hidden columns are added to the source table to store change tracking metadata, consuming minimal storage space.
Executing a DML statement that selects from a stream consumes all change data in the stream upon successful transaction commit.
To ensure multiple statements access the same change records in the stream, encapsulate them with an explicit transaction statement (BEGIN .. COMMIT).
Once data is consumed from streams, it is automatically deleted from the streams. However, you cannot revert the deletion of data from streams once it has been consumed.
Stream statements start with Begin and ends with Commit.
Syntax:
Create or replace a stream object named <name> associated with a specific table <table_name>.
create or replace stream S_EMP on table SF_EMP APPEND_ONLY=FALSE;
Optionally specify a comment for the stream.
Use the
APPEND_ONLYparameter to control which DML operations are captured:Set
APPEND_ONLYtoTRUEto only capture inserts on the source table, which can be useful when truncating the source table.Set
APPEND_ONLYtoFALSEto capture all DML operations (inserts, updates, deletes) on the source table.
In realtime we will use merge statements to pull the data from streams into required tables.
Metadata columns in streams:
METADATA$ACTION: Indicates the action performed on the row, which can be either INSERT or DELETE.METADATA$ISUPDATE: Indicates whether the recorded action (INSERT or DELETE) is part of an UPDATE operation applied to the rows in the source table.METADATA$ROW_ID: Provides a unique and immutable ID for each row, enabling tracking of changes to specific rows over time.When we are inserting the data from stream into historical table
METADATA$ACTION is Insert and METADATA$ISUPDATE=False.When we are Deleting the data from stream into historical table
METADATA$ACTION is Delete and METADATA$ISUPDATE=False.When we are Updating the data from stream into historical table
METADATA$ACTION is Delete(Old_Data) and METADATA$ISUPDATE=TrueMETADATA$ACTION is Insert(New_Data) and METADATA$ISUPDATE=True
Tasks in Snowflake
A task in Snowflake can execute a single SQL statement, including calls to stored procedures.
Tasks can be integrated with table streams to create continuous ELT workflows, processing recently changed table rows.
Tasks can also be used independently for various purposes, such as:
Generating periodic reports by inserting or merging rows into a report table.
Performing periodic tasks like calling the ALTER PIPE ... REFRESH statement for Snowpipe to handle missed or delayed Amazon S3 event notifications.
Tasks are scheduled to run at specified intervals and do not rely on event sources to trigger their execution.
Data loading into snowflake by using snowpipe , stream and Task with an example
Step 1: Create a snowpipe to ingest data into a raw table Employee_Raw table structure with Employee_id,Employee_name,Employee_location,Load_Flag,Load_Timestamp
create or replace table Employee_raw(Employee_id integer,Employee_name varchar(100),Employee_location varchar(100),Load_Flag varchar(10),load_timestamp timestamp_ntz);
create or replace table Employee_Final(Employee_id integer,Employee_name varchar(100),Employee_location varchar(100),Load_Flag varchar(10),load_timestamp timestamp_ntz);
create storage integration AWS_S3_SOURCE_DATA type = external_stage storage_provider = s3 storage_aws_role_arn = 'arn:aws:iam::992382397327:role/sharathsnowflakerole' enabled = true storage_allowed_locations = ('s3://snowflake1910');
create or replace stage stg_S3_Source_data url='s3://snowflake1910/' storage_integration = AWS_S3_SOURCE_DATA;
create or replace pipe pipe_Sf_Emp auto_ingest = true as copy into emp from @stg_S3_Source_data/;
Step 2: Create a Stream on Employee_Raw table with append is True.
create or replace stream S_EMP on table emp_raw append_only=TRUE;
Step 3: Write a merge Query to pull the data into final Table from Stream.
merge into Employee_Final a using (select Employee_id,Employee_name,Employee_location,Load_Flag,Load_Timestamp from S_EMP qualify row_number() over (partition by Employee_id order by load_timestamp desc)=1) b on a.Employee_id=b.Employee_id when matched and b.Load_Flag='D' then delete when matched then update set a.Employee_name = b.Employee_name,a.Employee_location = b.Employee_location ,a.Load_flag=b.Load_Flag, a.Load_Timestamp=b.Load_Timestamp when not matched then insert(Employee_id,Employee_name,Employee_location,Load_Flag,Load_Timestamp) values(b.Employee_id,b.Employee_name,b.Employee_location,b.Load_Flag,b.Load_Timestamp);
Step 4: Schedule the merge Query using Task for every 5 min.
CREATE TASK mytask1 WAREHOUSE = COMPUTE_WH SCHEDULE = '1 minute' WHEN SYSTEM$STREAM_HAS_DATA('S_EMP') AS
merge into Employee_Final a
select Employee_id,Employee_name,Employee_location,Load_Flag,Load_Timestamp from S_EMP bqualify row_number() over (partition by Employee_id order by load_timestamp desc)=1) b on a.Employee_id=b.Employee_id when matched and b.Load_Flag='D' then delete when matched then update set a.Employee_name = b.Employee_name,a.Employee_location = b.Employee_location ,a.Load_flag=b.Load_Flag, a.Load_Timestamp=b.Load_Timestamp when not matched then insert(Employee_id,Employee_name,Employee_location,Load_Flag,Load_Timestamp) values(b.Employee_id,b.Employee_name,b.Employee_location,b.Load_Flag,b.Load_Timestamp);
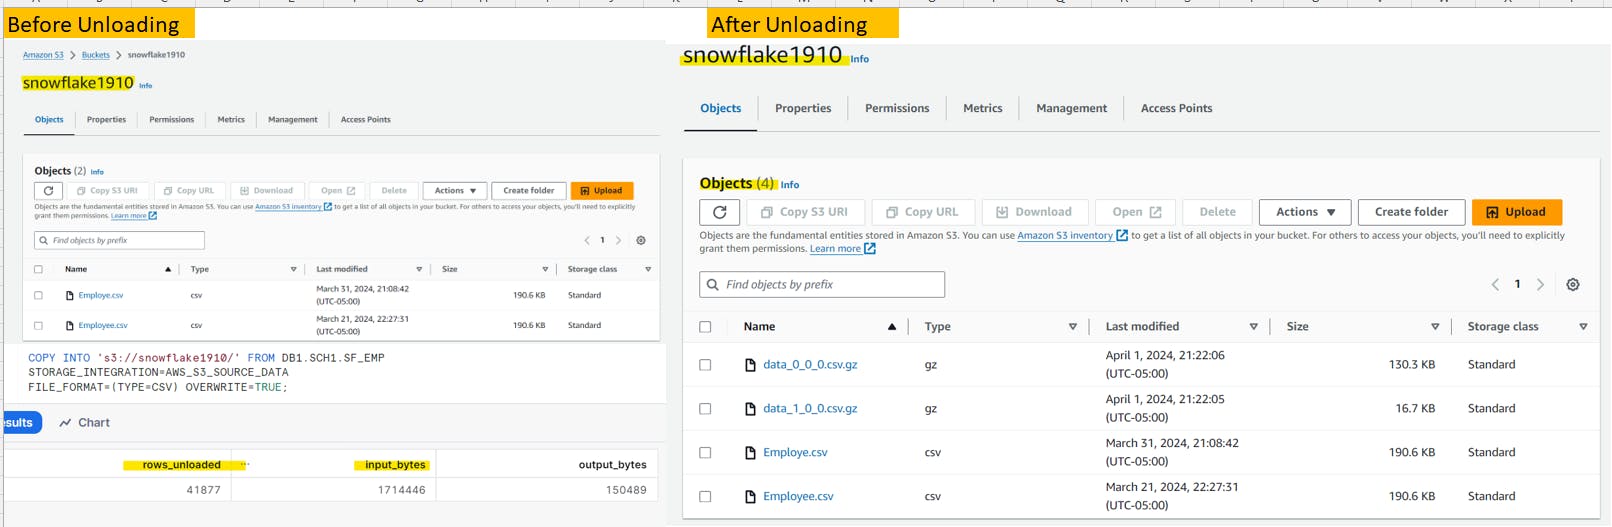
Data unloading from SnowFlake
Snowflake supports bulk unloading of data from a database table into flat, delimited text files.
We can unload the data into external location with storage integration
Strored Procedures in Snowflake
In Snowflake, stored procedures are written using JavaScript along with SQL.
The JavaScript portion of the stored procedure code must be enclosed within either single quotes ' or double dollar signs $$.
Using $$ makes it easier to handle JavaScript code that contains single quotes without “escaping” those quotes.
Syntax:
CREATE OR REPLACE PROCEDURE create_stmt()
RETURNS FLOAT LANGUAGE JAVASCRIPT EXECUTE AS OWNER AS
$$
var my_sql_command1 = "insert into Employee values(1000,'Sharath','USA')";
var statement1 = snowflake.createStatement({sqlText: my_sql_command1});
statement1.execute();
$$
CALL create_stmt();
Binding Variables
Binding a variable to a SQL statement allows you to use the value of the variable in the statement.
You can bind NULL values as well as non-NULL values.
The data type of the variable should be appropriate for the use of the value in the SQL statement. Currently, only JavaScript variables of type number, string, and SfDate can be bound.
CREATE OR REPLACE PROCEDURE bind_vars()
RETURNS FLOAT LANGUAGE JAVASCRIPT EXECUTE AS OWNER
AS $$
var Employee_Id=1000; var Employee_Name='ramu'; var Employee_Location='USA'; var my_sql_command1 = "insert into emp values(:1,:2,:3)"; var statement1 = snowflake.createStatement({sqlText: my_sql_command1,binds: [Employee_Id,Employee_Name,Employee_Location]}); statement1.execute();
$$
CALL bind_vars();
Stored Procedures with Binding Input Parameters
CREATE OR REPLACE PROCEDURE
bind_vars_input(p_Employee_Id string,p_Employee_name string,p_Employee_Location string)
RETURNS FLOAT LANGUAGE JAVASCRIPT EXECUTE AS OWNER
AS $$
var my_sql_command1 = "insert into Employee values(:1,:2,:3)";
var statement1 = snowflake.createStatement({sqlText: my_sql_command1,binds: [p_Employee_Id p_Employee_name ,p_Employee_Location]});
statement1.execute();
$$
call bind_vars_input(7007,'Sharath','Missouri');
Stored Procedures with result set
create or replace procedure read_result_set()
returns float not null
language javascript as $$ var my_sql_command1 = "select from Employee"; var statement1 = snowflake.createStatement( {sqlText: my_sql_command1} );
var result_set1 = statement1.execute();
// Loop through the results, processing one row at a time... //
while (result_set1.next()) {
var column1 = result_set1.getColumnValue(1);
var new_column=column110;
var my_sql_command2 = "update emp set Employee_Id=:1 where Employee_Id=:2"; var statement2 = snowflake.createStatement( {sqlText: my_sql_command2,binds:[new_column,column1]} );
statement2.execute() }
return 0.0;
$$ ;
call read_result_set()
Overloaing Of Stored Procedures
create or replace procedure Sp1 (FLOAT_PARAM1 FLOAT) returns string language javascript as $$ return FLOAT_PARAM1; $$ ;
create or replace procedure Sp1(FLOAT_PARAM1 FLOAT, FLOAT_PARAM2 FLOAT) returns string language javascript as $$ return FLOAT_PARAM1 * FLOAT_PARAM2; $$ ;
In above two scenarios we have same stored procedure name with diffrent number of arguments.
call Sp1(5.14::FLOAT); It will call Sp1 with single argument.
call Sp1(5.14::FLOAT, 2.00::FLOAT);It will call Sp1 with two arguments.
Exception handling in stored procedures
create or replace procedure broken()
returns varchar not null language javascript
as $$
var result = "";
try { snowflake.execute( {sqlText: "inser into Employee values(1001,'Sharath','USA')"} ); result = "Succeeded"; }
catch (err) { result = "Failed: Code: " + err.code + "\n State: " + err.state; result += "\n Message: " + err.message; result += "\nStack Trace:\n" + err.stackTraceTxt; }
return result;
$$
User-Defined Functions
Functions in Snowflake must have a return type and return a value, typically used to provide result sets to the UI via select statements with parameters.
We can write a UDF that returns a single value (a scalar UDF) or that returns a tabular value (a user-defined table function, or UDTF).
A scalarfunction (UDF) returns one output row for each input row. The returned row consists of a single column/value.
Syntax:
create or replace function area_of_circle(radius float) returns float as $$ pi() radius radius $$ ;select area_of_circle(10);create function profit() returns numeric(11, 2) as $$ select sum((retail_price - wholesale_price) * number_sold) from purchases $$select profit()A tabularfunction (UDTF) returns a tabular value for each input row. In the handler for a UDTF, you write methods that conform to an interface required by Snowflake. These methods will:
Process each row in a partition (required).
Initialize the handler once for each partition (optional).
Finalize processing for each partition (optional).
Syntax:
create or replace function t() returns table(msg varchar) as $$ select 'Hello' union select 'World' $$;select * from table(t())create or replace function orders_for_product(prod_id varchar) returns table (product_id varchar, quantity_sold numeric(11, 2)) as $$ select product_id, quantity_sold from orders where product_id = prod_id $$ ;select * from table(orders_for_product('compostable bags'));
Data Cloning in Snowflake
The "CREATE CLONE" command duplicates an existing object within the system.
Its main purpose is to create identical copies of databases, schemas, and non-temporary tables without consuming additional storage space.
It can also be used to swiftly generate duplicates of other schema objects such as external stages, file formats, and sequences.
Syntax:
CREATE [ OR REPLACE ] { DATABASE | SCHEMA | TABLE | STREAM } [ IF NOT EXISTS ] <object_name> CLONE <source_object_name>;
Cloning Table
CREATE OR REPLACE TABLE employees_clone CLONE emp;
Cloning Database
CREATE or Replace DATABASE TEST_CLONE CLONE TEST;
Cloning Schema
CREATE or Replace SCHEMA DEMO_CLONE CLONE DEMO;
Properties of Cloning:
Clones do not consume storage until DML operations are executed.
Each DML operation on a clone creates separate partitions.
Modifications to a cloned object do not impact the original, and vice versa.
You can clone databases, schemas, and tables.
External stages are cloned, but internal stages are not.
When cloning a pipe, ensure it points to the correct table to avoid issues.
While a stream is created with cloning, it initially lacks the data from the original stream.
Time Travel in Snowflake
Snowflake Time Travel allows accessing historical data within a specified period.
It facilitates restoring deleted or altered data-related objects like tables, schemas, and databases.
Time Travel enables duplicating and backing up data from specific points in the past.
It supports analyzing data usage and manipulation trends over defined time periods.
Syntax:
create table Emp(col1 number, col2 timestamp_ltz(9)) data_retention_time_in_days=1;
CREATE TABLE Emp (col1 NUMBER,col2 TIMESTAMP_LTZ(9)
) DATA_RETENTION_TIME_IN_DAYS = 1;
If we need data before specific timestamp select * from Emp before(timestamp => '2020-05-16 20:50:06.619 -0700'::timestamp_ltz);
If we need at specific timestamp select * from Emp at(timestamp => '2020-05-16 20:50:06.619 -0700'::timestamp_ltz);
If we need data before execution of particular statememt with Query id
select * from mytable before(statement => '01977208-00e3-742c-0000-00003b3594f5');
To create a clone table from a cloned table with a specific timestamp in Snowflake:
CREATE CLONE TABLE new_table_name CLONE OF cloned_table_name AT TIMESTAMP 'timestamp_value';
This command will create a clone table named "new_table_name" based on the state of "cloned_table_name" at the specified timestamp.
- To restore a dropped table named "mytable" in Snowflake, you would use the UNDROP TABLE command:
UNDROP TABLE mytable;
- This command will attempt to restore the dropped table "mytable" to its state before it was dropped.
Data Sharing in Snowflake
Data Sharing enables account-to-account sharing of data.
Instant access : Data is immediately available for use without delays. No data movement, loading or reconstruction required.
Live data : Data always remains current. Changes made in real time by a data provider are immediately available to data consumers without effort.
Secure, managed access :A data provider can share any amount of their data to any number of data consumers in a secure, governed manner with minimal effort.
Principal participants in Data sharing
Provider: A data provider is any Snowflake account that creates shares and makes them available to other Snowflake accounts to consume.
consumer: A data consumer is any account that chooses to create a database from a share made available by a data provider.
Share: Shares are named Snowflake objects that encapsulate all of the information required to share a database.
Data Sharing Characteristics
All database objects shared between accounts are read-only.
The objects cannot be modified or deleted, including adding or modifying table data.
Data sharing is currently only supported between accounts in the same region.
With Data Sharing, no actual data is copied or transferred between accounts.
Shared data does not take up any storage in a consumer account and, therefore, does not contribute to the consumer’s monthly data storage charges.
The only charges to consumers are for the compute resources (i.e. virtual warehouses) used to query the shared data.
Cloning is not allowed on shared objects.
Syntax:
create share myshare comment='To share data to other accounts';
grant usage on database to share myshare ;
grant usage on schema TEST.DEMO to share myshare ;
grant select on all tables in schema TEST.DEMO to share myshare ;
grant insert on all tables in schema TEST.DEMO to share myshare;
alter share myshare set accounts=ph53127;
show grants to share myshare;
Steps for Data Consumption--Consumer
Execute a CREATE DATABASE statement with the following data sharing-specific syntax
Syntax:
CREATE DATABASE <name> FROM SHARE <provider_account>.<share_name>
Example:
create database Sharath_share from share HS93537.MYSHARE;
Sharath_share database is a imported database and it will reflect the live data in realtime.We no need to refresh the data manually and it will update automically.
Reader Accounts in Snowflake
Data sharing in Snowflake is specifically designed for sharing data between Snowflake accounts. However, if you want to share data with someone who doesn't have a Snowflake account or isn't ready to become a licensed Snowflake customer, you can create what's called a "reader account."
A reader account, previously known as a "read-only account," is created, owned, and managed by the provider account. This means that as the data provider, you're responsible for all credit charges incurred by users in the reader account.
Reader accounts offer a simple, quick, and cost-effective way to share data without requiring the recipient to have their own Snowflake account.
Syntax:
Create managed account account1admin_name=myadmin1, admin_password='Sharath123' , type=reader;myadmin1 will get all access to that reader account, when you create a reader account virtual warehouses of provider account not shared with reader account.
We can login with username and password by using below link
{"accountName":"tk47431","loginUrl":"https://tk47431.us-east-2.aws.snowflakecomputing.com"}If we want to share the data to this reader account then we can use
alter share myshare set accounts=tk47431
Micro partitions in Snowflake
Limitations of Static partition are if we have 10 years of data and only one year has more number of rows, In that case one partition get overloaded and this is called skewed partition.Other limitation is we need to mention on which column we are creating partition for example partition by year;
By overcoming this limitations Snowflake has introduced dynamic partitioning
All data in Snowflake tables is automatically divided into micro-partitions, which are contiguous storage units.
Each micro-partition typically contains between 50 MB and 500 MB of uncompressed data.
Rows in tables are grouped into individual micro-partitions and stored in a columnar format.
Snowflake stores metadata about the rows stored in each micro-partition, including:
The range of values for each column in the micro-partition.
The number of distinct values.
Additional properties used for optimization and efficient query processing.
Benefits of Micro-partitioning:
In Snowflake, micro-partitions offer several advantages over traditional static partitioning:
Micro-partitions are automatically created and managed by Snowflake, eliminating the need for users to define and maintain partitions themselves.
Micro-partitions are small in size, typically ranging from 50 to 500 MB before compression. This small size enables efficient data manipulation (DML) and improves query performance.
Data within micro-partitions is stored in a columnar format, allowing for efficient scanning of individual columns. Only the columns referenced in a query are scanned, further enhancing query speed.
Snowflake automatically compresses columns within micro-partitions using the most efficient compression algorithm for each column. This helps reduce storage space and improves query performance.